Foamed Milk at Home: A Comprehensive Guide to Frothing Milk Perfectly
TL;DR
In this article, we will explore the art of frothing milk at home. We'll cover everything from the ideal milk temperature and types of milk to use, to the essential tools needed for creating rich, velvety coffee foam. Whether you prefer a latte, cappuccino, or simply want to elevate your coffee experience, mastering the technique of foaming milk will allow you to create café-quality beverages in the comfort of your own home.
Introduction:
There's something truly delightful about sipping on a perfectly crafted coffee with foamed milk. The silky texture and beautiful presentation make each sip a delight. While it may seem like a skill reserved for baristas, foaming milk at home is a skill you can quickly master. With a few key tips and the right tools, you can create impressive foam for your homemade lattes, cappuccinos, and more. Let's dive into the art of foamed milk and discover the secrets to achieving café-quality results.
1. Understanding Milk Temperature:
First of all, you need to start with hot milk in order to get the best foam. The heat helps to stabilize the foam so it doesn't fall flat immediately. The temperature range for frothing milk typically falls between 140°F (60°C) and 155°F (68°C). Using a milk thermometer is essential to ensure you reach the optimal temperature without overheating the milk.
2. Selecting the Right Milk:
The type of milk you choose plays a significant role in achieving the perfect foam. Whole milk is often preferred due to its higher fat content, contributing to a creamier and more stable foam. The fats in the milk help to create small bubbles that give the foam its silky texture. However, if you prefer a lighter option, you can experiment with 2% or skim milk. It's important to note that lower-fat milk may produce a foam that is less dense and may not hold its shape as well as foam made with whole milk. Alternative milk options such as soy, almond milk, or oat milk can also be frothed, but they may produce slightly different results due to their composition. It's recommended to choose unsweetened versions of these kinds of milk for better frothing results.
3. Different types of foam:
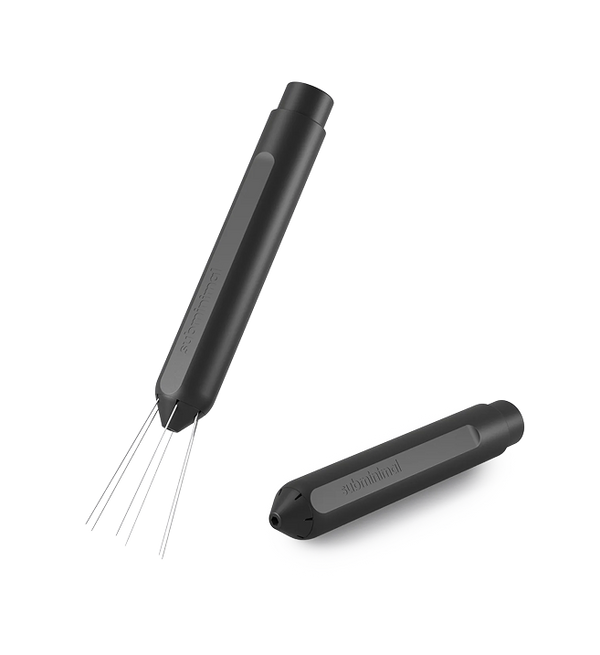
When it comes to creating foamed milk at home, there are various methods available, but not all foams are created equal. While a normal frother can produce froth, there is a distinct difference when it comes to microfoam created by an espresso machine's steam wand. Froth tends to be larger in bubbles, sits on top of the milk and is less velvety in texture compared to the fine, creamy microfoam produced by a steam wand. While froth may be suitable for some, those seeking the premium cafe-quality microfoam experience will find it necessary to invest in a NanoFoamer. Like an espresso machine's steam wand, it will allow you to achieve that sought-after microfoam perfection in your home.
4. Using the Nanofoamer:
To use the Nanofoamer, you must churn your warm milk for 20-30 seconds, starting in the middle to add air to the milk, then moving to the side and down to churn and incorporate the air for a perfectly consistent and homogenous microfoam blend. Continue foaming until the milk reaches the desired consistency. Microfoamed milk does not even look like foam anymore but has a consistency similar to wet paint. Once perfectly microfoamed, you can pour over your espresso and create some latte art.

5. Step-by-Step Guide to Frothing Milk with a milk frother:
Here's a simple guide to frothing milk at home:
- Step 1: Select your desired type of milk.
- Step 2: Pour the milk into a suitable frothing pitcher or container (like the FlowTip Milk Jug). Ensure that the container has enough room for the milk to expand during the frothing process.
- Step 3: Heat the milk to the desired temperature using a microwave or stovetop. Avoid overheating, as it can affect the taste and texture of the milk. If using a stovetop, heat the milk on low to medium heat while stirring continuously to prevent scorching.
- Step 4: Begin the frothing process.
- Step 5: Continue frothing until the milk reaches your desired foam consistency. The process usually takes about 20 to 60 seconds, depending on the tool used and the amount of foam desired. Avoid over-frothing, as it can lead to large bubbles and a less smooth texture.
- Step 6: Gently tap the frothing pitcher on a countertop to remove any large bubbles that may have formed during the frothing process.
- Step 7: Pour the foamed milk over your favorite beverage.
Frequently Asked Questions (FAQs):
Q1: Can I froth milk without a frother?
Yes, you can froth milk without a dedicated frother. Options such as manual milk frothers, or even using a French press can yield satisfying results. You will need to adjust the best milk frothing technique according to the tool you're using.
Q2. What type of milk jug is best for latte art?
In my opinion, there are no best brands. Rather what you want to look for is how the jug is constructed. For more intricate designs, you want to make sure you have a pointier spout. If you want to do big hearts or tulips, then a wider spout is better.
Q3: Can I froth non-dairy milk?
Yes, alternative milk options like soy, almond, or oat milk can be frothed. However, the results may vary due to differences in composition. Some non-dairy milk may not froth as well as dairy milk due to their lower fat content. It's recommended to experiment with different brands and types to find the one that produces the desired foam consistency. Keep in mind that certain additives or sweeteners present in some non-dairy kinds of milk may affect the frothing process, so opting for unsweetened versions is generally recommended.
Q4: What is the ideal temperature for frothing milk?
The ideal temperature for frothing milk is typically between 140°F (60°C) and 155°F (68°C). Be cautious not to exceed 160°F (71°C), as the milk may scorch and develop an unpleasant taste. Using a milk thermometer can help you achieve the desired temperature accurately.
Conclusion:
Mastering the art of frothing milk at home opens up a world of possibilities in your coffee-making journey. By understanding the importance of milk temperature, selecting the right type of milk, and utilizing the appropriate tools, you can create a velvety, luxurious foam to enhance your favorite beverages. Experiment with different techniques, troubleshoot any issues you encounter and explore new flavor combinations to elevate your frothed milk experience. With a little practice and patience, you'll soon be enjoying barista-level frothed milk in the comfort of your own home. Cheers to elevating your coffee and foamy-frothed milk experience!

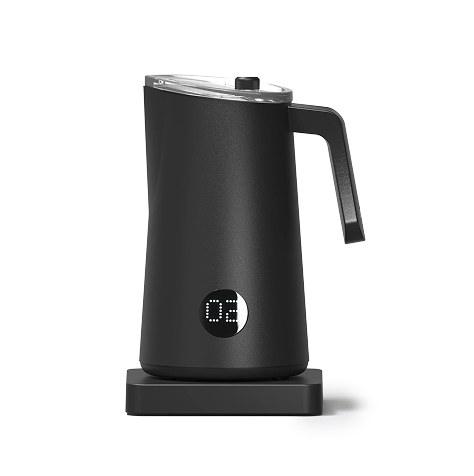
Make Perfect Microfoam at Home Today
Get your NanoFoamer V2 or NanoFoamer Lithium today and start making premium microfoam milk as if you had an espresso machine!
Related to this blog:
This thing is a game-changer. Do you need a dosing cup and scale in one? No. Does it streamline the brewing process and allow you to enjoy your delicious shot faster, and with less mess? Absolutely. 10/10 would buy again.