Perfecting Your Latte Art with These Milk Steaming Techniques
TL;DR
Learn how to steam milk for perfect latte art in this blog post. Discover the importance of milk steaming for texture and flavor, and explore the equipment needed, milk preparation steps, basic and advanced steaming techniques, troubleshooting tips, and the science behind achieving the ideal microfoam. Mastering these techniques will help you create stunning latte art designs that impress both your taste buds and your Instagram followers.
Introduction
Making a perfect latte art for your morning coffee can be a tricky task, but it doesn't have to be. With the right tips and tricks, you can learn how to steam milk and create beautiful designs with your espresso. In this blog post, we will provide you with some helpful techniques on how to steam milk and get the perfect microfoam for your latte art. Whether you’re a beginner or a professional barista, these tips will help you create the perfect microfoam and take your latte art to the next level.
The Importance of Steaming Milk for Latte Art
When it comes to latte art, steaming milk is an essential step that cannot be overlooked. The way you steam your milk can make or break the quality of your latte art. Why is steaming milk so important for latte art? Let's delve into the details.
First and foremost, steamed milk creates the perfect texture for your latte art. The process of steaming milk involves introducing air into the milk, creating tiny air bubbles that give the milk a creamy and velvety texture. This texture is crucial for creating the microfoam needed to form intricate latte art designs. Without properly steamed milk, your latte art will lack the defined and crisp patterns that make it visually appealing.
Furthermore, steaming milk at the right temperature enhances the flavor of your latte. When milk is steamed, the proteins and sugars within the milk undergo a chemical reaction that enhances its taste. Steaming milk to the proper temperature allows the flavors to develop, resulting in a rich and creamy texture that perfectly complements the espresso.
To achieve the perfect steamed milk for latte art, it's important to invest in the right equipment.
Traditionally, steaming milk to achieve smooth microfoam could only be done with the steam wand attached to an espresso machine, but some new innovations are now making it possible to achieve the same quality foam without the high cost of the espresso machine.
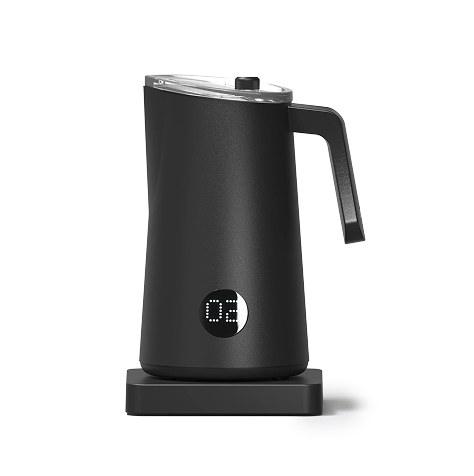
If you don't have an espresso machine with a steam wand, you will need a NanoFoamer, a contactless digital thermometer, and a latte pitcher or latte art milk jug. These tools will help you control the temperature, create the right amount of milk foam, and pour with precision.
In addition to equipment, proper milk preparation is key to achieving the desired results. The milk should be fresh and cold, as this will help create the right consistency during the steaming process. It's important to choose whole milk or milk with a higher fat content than skim milk, as this will contribute to a creamier and richer texture.
Steaming milk for latte art requires practice and precision, but once you master the technique, the possibilities are endless. So, the next time you're making your morning coffee, remember the importance of steaming milk for latte art and take the time to perfect your steaming technique. Your taste buds and your Instagram feed will thank you!
The Equipment You'll Need to Steam Milk
To achieve the perfect steamed milk for your latte art, you'll need a few essential tools. Here are the key equipment items that will help you create consistent and professional steamed milk:
1. Steam Wand: A steam wand is a key component of espresso machines and is used to introduce steam into the milk for steaming. It allows you to control the steam pressure and angle, creating the perfect microfoam. A high-quality steam wand is essential for achieving consistent results.
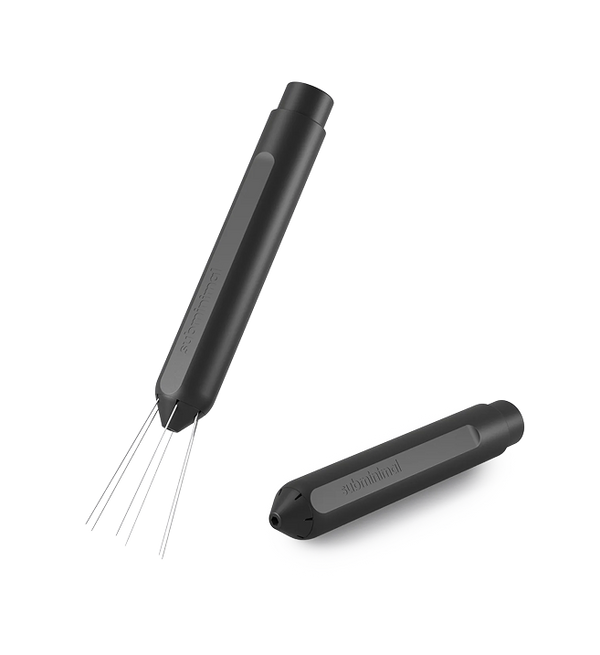
2. Handheld Milk Foamer: A handheld milk foamer is a small device that allows you to froth and foam milk quickly and easily. Most handheld milk frothers will only create dry foam (big bubbles) but the NanoFoamer is a handheld milk foamer capable of creating superfine microfoam identical to a steam wand.
3. Contactless Digital Thermometer: A contactless digital thermometer is crucial and convenient for monitoring the temperature of your milk during the steaming process. This tool ensures that you heat the milk to the optimal range of 150-155°F (65-68°C), preventing it from becoming burnt or underheated.
4. Latte Pitcher or Latte Art Milk Jug: A latte pitcher or latte art milk jug is a container specifically designed for steaming and pouring milk for latte art. It typically has a spout that allows for more controlled and precise pouring. These pitchers come in various sizes, so choose one that suits your needs.
By investing in these essential tools, you'll be equipped to create the perfect steamed milk for your latte art. Whether you're a beginner or an experienced barista, having the right equipment will make the steaming process easier and more enjoyable. So gather your handheld milk foamer, contactless digital thermometer, latte pitcher or latte art milk jug, and steam wand, and get ready to take your latte art to new heights.
Preparing the Milk for Steaming
To achieve the perfect steamed milk for your latte art, it's crucial to properly prepare the milk before the steaming process. Preparing the milk involves several important steps that will help you achieve the desired texture and flavor. Here are some key tips to follow when preparing your milk for steaming:
1. Start with cold milk: Using fresh milk is essential for achieving the best results. The freshness of the milk contributes to the overall taste and texture of the steamed milk. It's recommended to use cold milk straight from the refrigerator to help maintain the right temperature during the steaming process.
2. Choose the right milk fat content: The fat content in the milk plays a significant role in creating a creamy and velvety texture. It's recommended to use whole milk or milk with a higher fat content, as this will result in a richer and more flavorful latte. If you prefer a lighter latte, you can opt for lower-fat milk, but keep in mind that it may affect the overall texture of the steamed milk.
3. Purge the steam wand: Before steaming the milk, it's important to purge the steam wand to remove any condensation or leftover milk residue. This step ensures that you start with a clean surface and prevents any unwanted flavors from transferring to the milk.
4. Position the steam wand correctly: When steaming the milk, position the steam wand just below the surface of the milk for aerating and then push it deeper into the milk for microfoaming. This will allow the steam to incorporate air into the milk and create the desired microfoam. It's important to keep the steam wand at a slight angle to encourage proper aeration of the milk.

How to steam milk: Basic Steaming Technique
Steaming milk for latte art can seem like a daunting task, especially if you're new to the world of espresso and microfoam. But fear not! With a little practice and the right technique, you'll be able to steam milk like a pro and create beautiful latte art designs.
To start, fill your latte pitcher or milk jug with cold milk, leaving enough space for the milk to expand as it steams. Position the steam wand just below the surface of the milk, at a slight angle. This will allow the steam to incorporate air into the milk, creating tiny bubbles that give it a creamy texture.
Turn on the steam wand and let it run for a few seconds to purge any leftover milk residue. Then, fully submerge the steam wand into the milk and start steaming. To create the perfect microfoam, aim for a steady and controlled stream of steam. Avoid creating large bubbles by keeping the steam pressure low and gradually increasing it as the milk expands.
As you steam, keep an eye on the temperature of the milk using your contactless digital thermometer. The ideal temperature for steamed milk is around 150-155°F (65-68°C). Once the milk reaches this temperature, turn off the steam wand and remove it from the pitcher.
Now it's time to give your milk a whirl! Holding the handle of the milk pitcher, firmly, gently swirl the milk in a circular motion to mix the foam and milk together. This will help create a smooth and consistent texture throughout the pitcher.
Finally, it's time to pour your steamed milk into your espresso shot. Hold the pitcher at a slight angle and pour slowly, starting from a higher point and gradually moving closer to the cup. This will allow you to control the flow and create beautiful latte art designs.
Remember, mastering the basic steaming technique takes time and practice. Don't get discouraged if your first attempts aren't perfect. Keep experimenting, and adjusting your technique, and soon you'll be steaming milk like a pro, ready to create stunning latte art designs that will impress everyone. So go ahead, give it a try, and have fun creating your own latte art masterpieces!
Texturing Milk without a Steam Wand
If you don't have a steam wand and will be using the NanoFaomer to texture your milk, you'll want to follow similar steps as the technique above, with a few notable differences:
Preheat your milk to your desired temperature and then transfer it to your latte art pouring jug. You can preheat the milk in the microwave on the stovetop making sure you don't exceed 65°C (150°F). For a cleaner workflow, consider using the FlowTip Jug to pre-heat your milk on a stovetop as it is a unique latte art pouring jug that features a heat-resistant handle, allowing it to be used directly on a stovetop.
Using the NanoFoamer, submerge the impeller slightly and start churning, keeping the impeller just below the surface. This will agitate the milk and create foam. Maintain this position for just a few seconds, then push the impeller lower inside the milk and to the left side of the jug. The goal here is to submerge the impeller and not create more foam, but to hold a controlled vortex where the big bubbles previously created get pulled down and pushed through the fine mesh attached to the impeller.
Hold this position for about twenty seconds, or until the milk is perfectly smooth and silky. Be sure to avoid accidentally re-aerating the milk in the late stages of foaming as that will re-introduce big bubbles into your milk and these will float to the surface.
Troubleshooting Common Issues
If you're encountering common issues while steaming milk for your latte art, don't worry – you're not alone! Many baristas, both beginners and professionals, face challenges when creating the perfect microfoam. But fear not because in this section, we will address some of the most common problems and provide troubleshooting solutions.
Issue #1: Large Bubbles in the Foam
If you're finding large bubbles in your foam instead of a smooth and velvety texture, there could be a few reasons for this. Firstly, make sure you're positioning the steam wand correctly – it should be just below the surface and offset to the side. It should be quiet without any gushing sound of air being incorporated. Keep the steam pressure low and gradually increase it as the milk expands. By adjusting these factors, you should be able to achieve a finer texture in your foam.
Issue #2: Flat and Lifeless Milk
If your steamed milk is coming out flat and lacking any texture, there might not be enough air incorporated into the milk during the steaming process. Ensure that the steam wand is positioned correctly, just below the surface of the milk, and at a slight angle. This will allow the steam to introduce air into the milk and create the desired microfoam. Be careful not to overdo it, as this can create large bubbles. With practice and precision, you'll be able to achieve the perfect balance and create a rich and creamy texture in your milk.
Issue #3: Burnt Milk or Unpleasant Taste
If you're noticing a burnt smell or taste in your milk, you're likely overheating it during the steaming process. It's crucial to monitor the temperature of the milk using a contactless digital thermometer. The ideal temperature for steamed milk is around 150-155°F (65-68°C). Going beyond this range can result in overheating and negatively impact the taste of your latte. If you find that your milk is consistently burning, try adjusting the steam pressure or the positioning of the steam wand to ensure a more controlled and gradual heating process.
Issue #4: Inconsistent Foam
If you're struggling to achieve consistent foam in your milk, it could be due to improper milk preparation or inconsistent technique. Make sure you're using cold and fresh milk, as this helps maintain the right consistency during steaming.
The Science Behind Perfect Steamed Milk
When it comes to steaming milk for your latte art, there is a science behind it. Understanding the science behind perfect steamed milk can help you achieve consistent and professional results every time. So, let's dive into the science and learn why certain techniques and temperatures are crucial for creating the perfect microfoam.
One of the key factors in achieving the perfect steamed milk is temperature. When milk is heated, its proteins and sugars undergo a chemical reaction known as the Maillard reaction. This reaction enhances the flavors of the milk, resulting in a rich and creamy taste that complements the espresso perfectly. However, if the milk is overheated, it can become burnt and develop an unpleasant taste. On the other hand, if the milk is underheated, it can lack the desired amount of creaminess and richness. This is why it's important to monitor the temperature of the milk using a contactless digital thermometer and aim for a temperature range of 150-155°F (65-68°C).
Another important aspect of steaming milk is creating microfoam. Microfoam refers to the tiny bubbles created when air is introduced into the milk during the steaming process. These bubbles give the milk its creamy and velvety texture, which is crucial for creating intricate latte art designs. The key to creating microfoam lies in the amount of air incorporated into the milk. By positioning the steam wand just below the surface of the milk, at a slight angle, then lowering the steam wand and gradually increasing the steam pressure, you can achieve the perfect amount of microfoam. Too much air can create large bubbles, while too little air can result in flat and lifeless milk. Finding the right balance is key, and with practice and precision, you'll be able to create the desired texture every time.
Understanding the science behind perfect steamed milk can help you troubleshoot any issues you may encounter and refine your steaming technique. By paying attention to temperature and incorporating the right amount of air, you'll be able to consistently achieve the ideal microfoam for your latte art. So, keep experimenting, adjusting your technique, and embracing the science behind steaming milk to take your latte art to the next level.
Conclusion
Mastering the art of steaming milk is essential for creating the perfect foundation for impressive latte art. The texture and flavor enhancements achieved through proper milk steaming techniques are the keys to crafting visually appealing and delicious beverages. Armed with the right equipment, milk preparation steps, basic and advanced steaming methods, troubleshooting insights, and an understanding of the science behind the process, you're well-equipped to embark on your journey to becoming a latte art aficionado. So, embrace the learning process, practice diligently, and enjoy the delightful world of latte artistry.

Make Perfect Microfoam at Home Today
Get your NanoFoamer V2 or NanoFoamer Lithium today and start making premium microfoam milk as if you had an espresso machine!
Related to this blog:
This thing is a game-changer. Do you need a dosing cup and scale in one? No. Does it streamline the brewing process and allow you to enjoy your delicious shot faster, and with less mess? Absolutely. 10/10 would buy again.